



Prevenção de puxamento de slug em matrizes de estampagem: Causas e Soluções
Slug pulling occurs when a pierced slug remains attached to the punch and travels upward during the return stroke. The slug may stay on the punch face, drop back onto the strip, become trapped near the stripper, or return to the working area where it can be struck again.
Effective slug pulling prevention in stamping dies starts with identifying what is holding the slug to the punch. Common mechanisms include vacuum, lubricant adhesion, residual magnetism, burr clamping, unsuitable punch-to-die clearance, worn cutting edges, and insufficient die-wall retention.
Liberação, Alinhamento, die construction, and cutting-edge maintenance are broader tooling fundamentals covered in the Guia de matrizes de punção (inferido). This guide focuses specifically on diagnosing slug pulling and matching the correction to its actual cause.
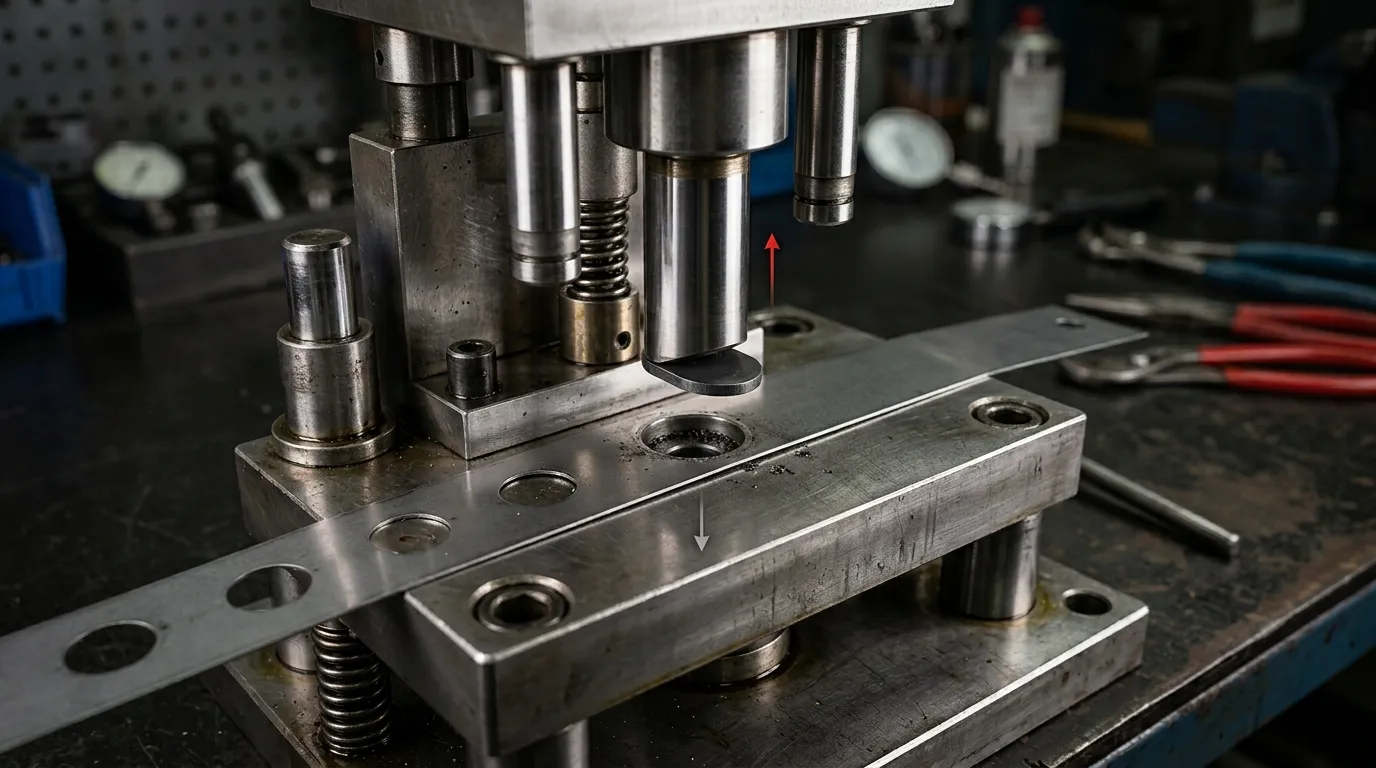
Como é a Aparência do Puxão do Slug e Por Que Pode Danificar o Die
During a normal piercing cycle, the punch enters the sheet, separates the slug, and pushes it into the die opening. As the punch retracts, the stripper holds the sheet down while the slug remains in the die channel or continues through the relief area.
With slug pulling, the separated slug follows the punch during retraction. It may remain attached for the full upstroke or release unexpectedly above the die surface.
Typical signs include:
- A slug stuck to the punch face.
- Loose slugs appearing on top of the strip.
- Circular or shaped dents near pierced holes.
- Repeated slugs around the stripper or die surface.
- Feed interruption after a piercing station.
- Unusual impact noise during a subsequent stroke.
- Cutting-edge marks that appear after a double hit.
- Intermittent defects that occur only at normal press speed.
A returned slug can be struck between the punch and strip during the next cycle. This may mark the part, chip a cutting edge, overload a small punch, or interrupt strip movement in a progressive die. If repeated impact is contributing to tool failure, the related Quebra de punção em matrizes de estampagem guide covers the broader fracture and overload mechanisms.
Confirme que o problema é realmente puxando o slug
Not every slug found near the die surface was carried upward by the punch. Identifying where the scrap becomes uncontrolled prevents the wrong corrective action.
| Condição | O que acontece | Observação típica | Principal área a investigar |
|---|---|---|---|
| Verdadeira slug pull | A bala permanece presa ao punção durante a retração | Slug visível na face do punção ou liberado acima da tira | Forças de fixação do punção ao slug e retenção do cunho |
| Empilhamento de slugs | Múltiplos slugs se acumulam dentro do canal do die | Increasing discharge resistance, blocked relief, compressed slug column | Die land, relief, outlet, and scrap path |
| Rolamento ou quique de slug | A bala se separa, mas se move de forma imprevisível após o lançamento | Munição solta encontrada perto do cunho sem evidências de fixação do punção | Geometria da saída do die e controle de sucata |
| Sucata flutuante | Detached light scrap returns to the working area through airflow, Vibração, or poor evacuation | Peças soltas se movem independentemente do punção | Chutes, outlets, airflow, and scrap handling |
Slow-cycle observation may reveal where the slug releases, but some failures only occur at production speed. High-speed video, where available, can show whether the slug follows the punch, pauses in the die opening, or becomes loose after discharge.
Other useful clues include:
- Oil patterns on the slug or punch face.
- Metallic debris or deposits around the cutting edge.
- A noticeable magnetic attraction between the punch and slug.
- Changes that began immediately after sharpening.
- A failure that appears only after increasing press speed.
- A slug that is already detached before it reaches the die surface.
Scrap suction can help remove detached light scrap, but it does not directly release a slug that is still attached to the punch. Component roles such as the punch, O botão, stripper, guide elements, and wear parts are covered more broadly in the Guia de componentes do die.
Por que uma bala segue o soco durante a retração
Slug pulling is best understood as a force-balance problem. Forces holding the slug against the punch act against forces that retain the slug in the die or push it away from the punch.
De acordo com Pesquisa revisada por pares sobre mecanismos de puxação de slugs, the dominant mechanism can change with punch diameter, Autorização, penetration depth, cutting speed, lubricant viscosity, condição de aresta, and material behavior. Several mechanisms may also act at the same time.
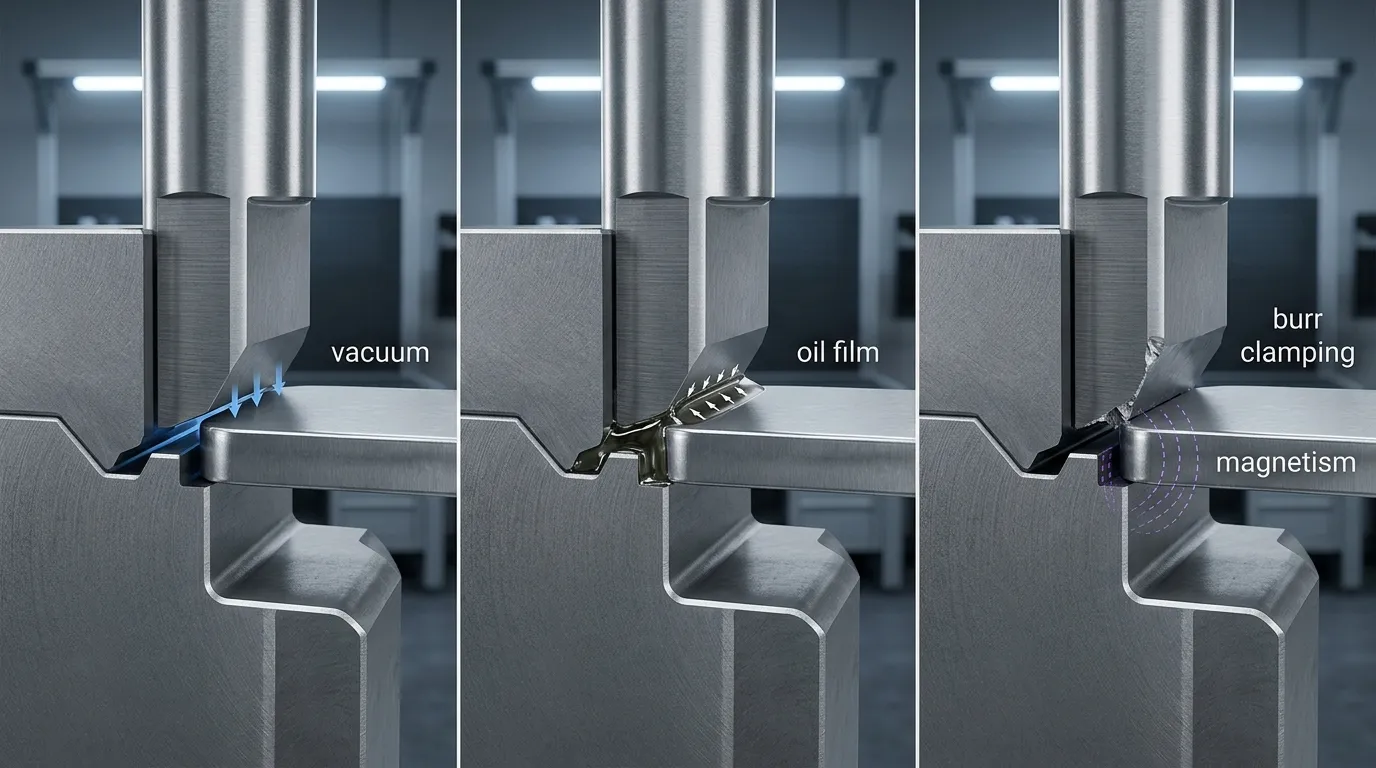
Vácuo e adesão de filme de óleo
After the slug separates, a small sealed space may form between the punch face and the slug. As the punch retracts, pressure in that space can fall below the surrounding pressure. The resulting vacuum force helps keep the slug against the punch face.
Vacuum-related pulling may become more influential when:
- The slug has broad, flat contact with the punch face.
- The punch retracts quickly.
- Air cannot enter the space easily.
- The punch travels deeply into the die.
- The punch diameter creates a relatively large sealed area.
- Lubricant helps maintain the seal.
Lubricant can also create its own adhesive force. A thick oil film between the punch face and slug may resist separation, especially when the lubricant has high viscosity or is applied excessively.
That does not mean lubrication should simply be removed. Lubricant may be necessary for tool wear control, strip movement, e qualidade das peças. The correct response is to review the lubricant type, quantity, Temperatura, and application consistency through controlled trials.
Magnetismo Residual e Fixação de Rebarbas
A steel punch can retain magnetism after grinding, sharpening, or contact with magnetic workholding equipment. If the slug material is ferromagnetic, magnetic attraction may be enough to carry a small or light slug upward.
Residual magnetism is especially suspect when slug pulling begins immediately after:
- Punch sharpening.
- Surface grinding.
- Magnetic chuck use.
- Punch replacement.
- Maintenance involving magnetic tools.
Burr clamping is a different mechanism. During fracture, the slug edge may develop a burr that mechanically grips the punch cutting edge. Worn edges, Lascamento, unsuitable clearance, and changes in fracture geometry can increase this gripping action.
The distinction matters. Demagnetizing will not correct mechanical clamping, while sharpening alone will not remove residual magnetism.
Retenção insuficiente do chip ou liberação incorreta do slug
The die channel must perform two tasks that can conflict with each other. It must resist the slug’s upward return, but it must also allow the slug to travel downward without stacking or excessive compression.
Punch-to-die clearance affects:
- Fracture behavior.
- Slug size and deformation.
- Burr direction and size.
- Contact between the slug and die wall.
- Cutting and stripping forces.
- The slug’s ability to move through the die.
Excessively open clearance may reduce useful die-wall retention or create unstable slug behavior. Excessively tight clearance may increase cutting force, Desgaste, burr-related clamping, or slug compression.
Die land length, relief geometry, internal wear, deposits, and damaged transitions also affect the holding and release forces. Pesquisa sobre Tensões de contato entre matriz e slug shows that die geometry and radial contact influence slug-retaining friction. More compression is not automatically better; excessive plastic deformation may reduce the effective retaining stress or contribute to stacking.
There is therefore no universal clearance percentage that prevents slug pulling in every material, Espessura, and punch geometry.
Diagnostice a causa antes de modificar a ferramenta
A structured investigation is usually more effective than immediately adding an ejector, changing clearance, or modifying the die.
- Confirm that the slug follows the punch.
Observe the slug during retraction and determine whether it remains attached, releases near the stripper, or becomes loose only after leaving the die. - Identify what changed before the failure appeared.
Check for recent sharpening, a new material coil, a lubricant change, higher press speed, component replacement, die regrinding, or clearance adjustment. - Record where the slug releases.
A slug that stays attached throughout the upstroke may indicate a strong vacuum, oil adhesion, magnetism, or burr clamping. A slug that releases near the die entrance may indicate marginal retention. - Inspect the punch face and cutting edge.
Look for wear, Lascamento, built-up material, oil residue, burr marks, or circular witness marks from repeated contact. - Inspect the die channel.
Check the land, relief, wall condition, deposits, damage, and evidence of slug stacking. - Check for residual magnetism.
Compare the punch’s attraction before and after demagnetizing when magnetic sticking is suspected. - Verify the actual clearance.
Do not rely only on the nominal drawing. Confirm punch size, A Abertura, Desgaste, and clearance per side in the current tool condition. - Review punch penetration.
Too little penetration may fail to advance the slug into a retaining or relief region. More penetration, no entanto, may increase the volume change beneath the punch and strengthen vacuum during withdrawal. - Compare slow and production-speed behavior.
A setup that works during slow cycling may fail when withdrawal speed, Lubrificação, Vibração, and thermal conditions reach normal production levels. - Change one variable at a time.
If clearance, Lubrificação, Velocidade, and penetration are changed together, the team cannot reliably identify which adjustment corrected or worsened the problem.
All inspection and testing should follow the plant’s approved press-safety and toolroom procedures.
Compare a solução com a causa confirmada
Start with reversible maintenance and setup corrections. Move to process changes next. Punch-side or die-side modifications should follow only when the observed mechanism justifies them.
Manutenção e Correções de Configuração
| Condição observada | Confere | Possível correção |
| O problema começou após a moagem | Atração magnética residual | Desmagnetize o punção e verifique o resultado |
| Filme de óleo visível entre o punção e o slug | Quantidade de lubrificante e viscosidade | Correção da aplicação excessiva ou inconsistente |
| Marcas de rebarba ou borda seguram o punção | Cutting-edge wear, Lascamento, Autorização | Restaure a borda e verifique novamente a folga real |
| Depósitos na parede de punção ou matriz | Captação de material ou contaminação | Limpe as superfícies afetadas e investigue a origem |
| Marcas de testemunha desiguais | Alinhamento do punção e do dado | Corrija o alinhamento antes de mudar a geometria |
| O problema começou após a substituição | Dimensões instaladas e penetração | Confirme se o novo componente corresponde ao desenho e à configuração |
These checks are relatively low cost and can reveal whether the failure was introduced by maintenance or setup rather than the original die design.
Ajustes de Processo e Geometria
Clearance should be reviewed as part of the whole cutting condition, not changed in one direction by default. The correct value depends on the material, Espessura, hole size, part-quality requirement, tool condition, and die geometry.
Punch penetration also requires careful evaluation. Increasing entry may help place the slug deeper into a retaining section, but it may also increase vacuum effects. Reducing entry may decrease vacuum volume while leaving the slug insufficiently controlled by the die.
Other controlled adjustments may include:
- Reviewing lubricant quantity and delivery position.
- Comparing lower and normal production speeds.
- Correcting inconsistent material feeding or strip support.
- Restoring the intended die land and relief condition.
- Confirming that the slug can move downward without obstruction.
After each change, check hole quality, burr condition, stripping behavior, tool marks, and scrap movement. A correction that stops slug pulling but creates excessive burrs or die-channel stacking is not a complete solution.
Modificações nas Ferramentas do Lado do Punção e do Lado do Molde
Punch-side modifications act directly on the slug or the pressure beneath the punch:
- Punção ventilada: Provides a path for pressure equalization and is most relevant when vacuum is the dominant mechanism.
- Mechanical slug ejector: Uses a spring-loaded or resilient element to push the slug away from the punch face.
- Compressed-air blow-off: Applies a timed downward force through or near the punch.
- Geometria de cisalhamento: Reduces full-face contact or deforms the slug so it separates more easily from the punch.
Die-side modifications increase resistance to upward movement or improve controlled discharge:
- Slug-retention grooves or catcher features: Create local interference below the cutting edge.
- Controlled die-wall contact: Uses the die channel to generate sufficient retaining friction.
- Corrected land and relief geometry: Holds the slug where needed, then permits downward release.
- Repair or replacement: Restores worn or damaged internal geometry.
Each option has limitations. Small punches may not have enough internal space for a vent or ejector. Air passages can clog, consume compressed air, or weaken a slender punch. Ejector elements can fatigue. Shear geometry may create side loading or unacceptable slug deformation. Retention features must remain effective after sharpening and must not create slug stacking.
Pesquisa em Ar de alta pressão para remoção de slugs also shows why pneumatic approaches should be treated as application-specific tooling solutions rather than universal retrofits.
Compare métodos de prevenção de puxamento de slugs por mecanismo e troca
| Método | Mecanismo de melhor ajuste | Principal vantagem | Limitação principal | O que verificar |
| Desmagnetização | Magnetismo residual | Rápido e minimamente invasivo | Não corrige a fixação a vácuo ou a rebarba | A atração magnética é reduzida e a tração para |
| Análise de lubrificante | Adesão de óleo e filme | Pode corrigir o problema sem modificar a ferramenta | Pouco lubrificante pode aumentar o desgaste | Tool wear, strip movement, and part quality remain acceptable |
| Restauração de bordas | Fixação de rebarba ou borda de corte gasta | Restaura a condição pretendida da fratura | O afiamento pode alterar o magnetismo de entrada ou saída | Condição de aresta, penetration, and magnetism |
| Correção de folga | Fratura ruim ou retenção do cunho | Aborda uma variável de corte fundamental | Wrong adjustment can increase burrs, force, or wear | Hole quality, Rávidas, stripping, and slug movement |
| Ajuste de penetração | Slug não entrando na região correta do die | Pode melhorar o posicionamento do projétil | Uma entrada maior pode fortalecer o vácuo | Posição do slug e comportamento na velocidade de produção |
| Punção ventilada | Vácuo | Equaliza diretamente a pressão | A passagem pode entupir ou reduzir a força do soco | O caminho do ar permanece aberto e o punção permanece estruturalmente adequado |
| Ejetor mecânico | Forte adesão facial | Adiciona força de separação positiva | Requer espaço e manutenção contínua | Ejector force, fatigue, and timing |
| Ar comprimido | Vácuo ou adesão persistente | Forte, controllable separation | Needs air supply, timing, and clean passages | Air consumption, clogging, and reliable ejection |
| Geometria de cisalhamento | Contato facial amplo ou aderência | Interrompe o contato sem um mecanismo interno | Pode causar carga lateral ou deformação em slug | Carregamento de punção e requisitos de peças |
| Recurso de retenção de cunhos | Resistência insuficiente à reversão do slug | Segura a bala abaixo da aresta de corte | Pode afetar o afiamento e o escoamento de sucata | A retenção permanece eficaz sem empilhamento |
| Sensor de proteção contra o die | Ciclos anormais intermitentes | Pode parar a prensa antes de causar danos repetidos | Detecta o problema, mas não remove sua causa | Reliable detection under oil, Vibração, and normal speed |
The best option is determined by the confirmed mechanism, available tool space, punch strength, material conditions, Requisitos de manutenção, and whether the method prevents, removes, or only detects the abnormal slug.
Verifique se a correção funciona na velocidade de produção
A few successful slow strokes do not prove that the problem is resolved. Vácuo, lubricant behavior, Vibração, and scrap movement can change as the press reaches normal operating speed.
Use a controlled verification sequence:
- Confirm consistent slug release during reduced-speed observation.
- Increase to normal production speed according to approved procedures.
- Check that slugs travel through the intended die and scrap path.
- Inspect pierced holes and surrounding surfaces for new marks.
- Check that burr condition has not worsened.
- Confirm that stripping remains stable.
- Inspect the punch and die edges for unusual witness marks.
- Make sure slugs are not accumulating in the die channel.
- Observe the tool after it reaches normal operating temperature.
- Record any recurrence rather than judging the result from a few cycles.
The test record should include the material lot, lubricant condition, Velocidade de pressão, changed variable, run duration, observations, and inspection results. This makes later recurrence easier to trace.
Informações a serem coletadas antes de solicitar uma modificação por punção ou matriz
When maintenance and controlled process adjustments do not resolve slug pulling, a tooling supplier will need more than a damaged punch sample.
Prepare:
- Part or strip drawing.
- Punch and die dimensions.
- Material grade and thickness.
- Hole or slug shape and size.
- Actual clearance per side.
- Punch penetration depth.
- Die land and relief dimensions.
- Press type and production speed.
- Lubricant type and application method.
- Sharpening and maintenance history.
- Photos of the punch face, cutting edge, die channel, slug, and burr.
- Video showing when and where the slug releases.
- Frequência de falha.
- Recent process or tooling changes.
- Corrections already tested and their results.
- Required hole, burr, and surface-quality criteria.
Complete application data helps distinguish between a replacement component, a geometry correction, or a process problem that would not be solved by a new punch.
SunshinePro's pino perfurador personalizado page confirms drawing-based customization of punch dimensions, Perfis, Materiais, e tratamentos superficiais. It also lists CNC machining, EDM, moagem, e tratamento térmico. These verified capabilities support component review, but they do not by themselves confirm availability of vented punches, Sistemas ejetores, pneumatic passages, or slug-retention features.
Quando a Revisão de Substituição ou Ferramentas Personalizadas é Justificada
Replacement or custom tooling review becomes reasonable when:
- The punch or die is too worn or damaged for practical restoration.
- Actual geometry no longer matches the intended clearance or penetration.
- The die channel cannot provide reliable retention and discharge.
- Slug pulling returns after confirmed maintenance and process corrections.
- A different punch profile or component dimension is required.
- A proposed vent, ejetor, shear, or retention feature needs structural review.
Listas SunshinePro Cunhos e pinos de perfuração among its product categories and offers drawing-based custom punch components. For a technical review, provide the drawings, material information, tool dimensions, Velocidade de pressão, lubricant conditions, and observed slug behavior through the Página de contato SunshinePro. The goal should be to review the component against the confirmed failure mechanism rather than requesting a generic anti-slug modification.
Compartilhe:


Escrito por Sunshine
Em Sol, Somos um fabricante e fornecedor profissional de componentes de moldes de precisão, oferecendo uma ampla variedade de produtos para aplicações de estampagem e molde por injeção. Nosso foco principal inclui a formação de matrizes, pinos e mangas ejetor, e postes guia e buchas. Com usinagem CNC avançada, Controle rigoroso de qualidade, e fortes capacidades de produção, Garantimos confiabilidade, Peças de alta precisão, juntamente com componentes padrão em estoque para fornecimento global rápido e eficiente.
NOTÍCIAS
RECEBA O SERVIÇO
Com peças de qualidade para todos os orçamentos e equipe amigável treinada para tornar sua visita informativa e sem complicações.
